Wednesday, May 18, 2011

Making of a Dress Form Part 1 of 4 - Cast Yourself

I've always wanted a custom made dress form, but one can run upwards of $800, and the cheapies sold at a local craft store are just unusable. Also, custom made is really not an exact replica of you, just measurements and generalizations of your body. But what could be better then draping over a form that's an exact copy of you!

Supplies...


  • Bulk Plaster Gauze 4in x 135 feet [at least]
  • Plastic Tub
  • Small amount of water
  • Sharp Scissors [other sites will say you need bandage scissors, really good ones are pricey, and cheap ones at a local drug store will fall apart, halfway through]
  • Plastic drop cloth
  • Plastic wrap [from local supermarket]
  • Plastering assistant [human you are comfortable with]
  • Portable heater
  • Rubber bands
  • Permanent marker

Let the mummification begin...

Cut plaster roll into strips. It took about 80 - 4 x 14 and 20 - 4 x 8 inch strips to wrap me in 3 layers of plaster. I am size 2, so calculate according to your size. [Have it ready, you don't want your plastering assistant to stop and have to cut more.]

Wear a tight tee shirt. The kind that fits you in every spot, and one you don't mind parting with--it won't be so pretty after you are done with it. Also wear short tights, or regular underwear.

Stand straight. [My natural posture is to stand like a gymnast, that will not work for a good dress form. Straight as in your back straight against the wall. You didn't just do a dismount ;)].
Wrap plastic wrap from the hips [below the bum or however low you want it to go] to right under the chest. Do not wrap your chest. Why? It will flatten it and look unnatural [or like a 13 year old boy...hehehe].

Wet one strip at a time and start wrapping from the bottom up. You will need to do 3 layers. Horizontal, vertical and another horizontal. Start every new layer from the bottom. [Do not wiggle. As a matter of fact don't breathe].

The plaster will start to become colder as it dries. You will start to feel confined and very uncomfortable. Your natural reaction will be to do only 2 layers so this goes faster, but that won't be enough [the cast will fall apart in places when you try to cut it off].

The cast should feel dry to the touch. The portable heater will help speed drying and will keep you warm at the same time.

When all that's done, mark at the sides of the cast [some say to cut at the chest and back, I don't think those are good places]. Try to find the center of the mass and cut the cast in half at the sides. [While the cast dries, it attaches itself to your shirt. So your shirt will get holes when the form is cut away].

Once the cast if off you, gently put it back together, wrap it with plastic wrap around the waist, use a rubber band around the neck and arms, stand it [do not lay] and let it dry for 24 hours.

time....We had to do two casts. The first one didn't come out as planned. Posture and chest came out deformed. It really looked nothing like me. It also took about 3.5 hours from start to finish. And my back was killing me since I stood like a gymnast the entire time. For the second cast, we knew what went wrong and corrected all the issues. It also took "only" 1 hr 20 min to wrap and another hour for drying.

tips...Several smaller cut strips work better around the armhole and neck. Try to cast on a non-damp day, as the plaster will dry faster.

options....with or without arms. Without is true to a real form. An arm can be made separately.


Tuesday, May 17, 2011

Coffee Book Cover

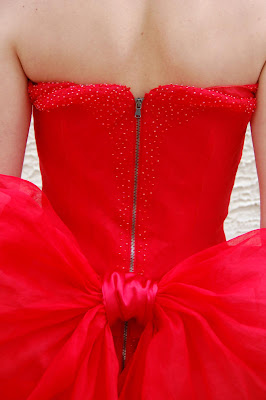
This is my most, absolutely favorite shot of the dress. Red dress coffee book cover anyone? :)

Finally or Making of the Red Dress Part 3.


The fabric is finally ready. Design has been sketched, dress has been draped in muslin and pattern has been finalized. Of course one hopes to have to make only one muslin version, and somehow it all magically works. This was not the case...I had to do the dress twice in muslin to make sure it hits at all the right spots, has the most flattering shape and feels great on. My model? Busty :) One must show off the assets, but not fall out at the same time. And this is where the inside of the dress comes in  with its corseted foundation reinforced by seven boning strips of varying sizes. Seven, I feel, is the perfect number. Less is loose, more makes it look like you're wearing armor. Internal gross grain belt, so the dress perfectly sits on the waist. Additionally, it’s fully lined. And the shell? The most awesome red cotton organdy! And  don't  forget 1200 hand sewn seed beads that  took only twenty hours to attach [some blindness was incurred in the process...hmmm]. Oh and the bow, let's not forget the bow -- detachable, so you make a dramatic entry, then leave it at coat check so dancing can go on.


Monday, May 16, 2011

Adventures of Fabric Dyeing or Making of the Red Dress Part 2

I’ve done small batches here and there, but never actually 12 yards at once. The plan is to have it all come out uniform, no streaks or dark spots, but of course that's easier said than done.


So here goes the adventure…6 yards of cotton organdy, [Fabric Hunting in NY] and another 6 yards of regular pima cotton [used for lining and bodice structure]. We are going from white to red. I bought the dye here after doing extensive research and sample dyeing. These dyes are easy to use [although you might not think it’s the case after seeing the pictures] and result in the most brilliant, vibrant colors. Chinese red has been selected as a definite winner in the red color war. All the instructions you need on dyeing can be found here.

Some discoveries…Cotton organdy is a very good color fast fabric. It absorbs dye so well, it’s actually kind of crazy. Regular pima cotton, not so much. I put both fabrics in a giant tub when dyeing, hoping by doing so I would achieve the same color variation for both. Well, was I wrong. White cotton organdy came out just as I expected…INCREDIBLE! It ate up the dye in the tub so fast, that it only left crumbs for pima cotton. Pima cotton came out a sad raspberry instead. I had to re-dye pima cotton and still wasn't able to achieve the color I wanted. It was much closer, but since it was just lining I wasn’t going to loose sleep over it. [I didn’t just say that; close enough is unacceptable, but there were time constraints].

Conclusions…All cottons are not created equal. Dye all fabrics in their own fun tubs, with their own varying amounts of dye.

PS: NEVER ever pour soda ash right over the fabric, here comes a dark spot if you do! Wear a mask or look like a homeless cowboy in a bandana, it’s not good to breathe in.


Fabric Hunting in NY or Making of the Red Dress Part 1

well, I went to NY, literaLLy went to every fabric store. and none of the stores had what I was looking for. in fact when I asked for “cotton organdy“ I was asked what is that?
not sure it’s a good entry, because it’s mostly an annoyed rant. :)
so one seller said, “I don’t have it”
then says, “how much to you need?”
“if you don’t have it, what difference does it make how much i need?”
“well, another guy has it, but he requires to buy a lot”
“need 6 yards”
“well, he’d have to sell 50 yards”
“why don’t you buy the 50 yards, and I’ll get 6 from you…hahaha”
and then the other thing they keep asking is “what color?“    
“what color?! color is irrelevant„ do you have it? show me.”
“how much do you need? “
“can I see it 1st? maybe it’s poor quality! Or not what I even need!”